このブログを動かしているEmDash CMS が 0.3.0 にアップデートされました。
Cloudflare Workers(D1 + R2)環境で運用している当ブログを 0.1.0 から 0.3.0 へ更新した際の手順と、実際にハマったポイントを共有します。
ビルドエラーで詰まったら、とりあえず Step 4 の 4つのパッケージを入れてみてください。
0.1.0 → 0.3.0 の主な変更点まとめ
2段階のアップデート(0.2.0 および 0.3.0)が含まれるため、重要なポイントを整理して紹介します。
⚠️ 重要な変更(要対応:Breaking Change)
- 設定項目の統合:
passkeyPublicOriginがsiteUrlに名前が変わりました。
✨ 新機能(できるようになったこと)
- SEO・検索エンジン対応: コレクション(記事の種類)ごとにサイトマップが作られるようになり、検索エンジンに正しくサイト構造を伝えられるようになりました。
- リピーターフィールド: 「Q&A」や「メンバー紹介」など、同じ形式のデータを繰り返し入力するパーツが作れるようになりました。
- パンくずリスト: ページの上部によくある「ホーム > 記事一覧 > 記事タイトル」といったナビゲーションを出すためのデータが追加されました。
- プラグインフック: 記事を「公開」した瞬間に別のシステムへ通知を送る、といった拡張ができるようになりました。
🛠️ 性能・セキュリティの向上
- 表示のスピードアップ: データベースへの負荷が大幅に減り(クエリ数を1/3に削減)、記事一覧などの読み込みがよりスムーズになりました。
- セキュリティ強化: 全体的な安全性を高める対策(SQLインジェクション対策)や、設定ミスでページが無限ループする問題(ERR_TOO_MANY_REDIRECTS)への対策が行われました。
- 管理画面の使い勝手: 外部サイトの画像が管理画面で表示されない問題や、メニューエディタのリンク設定、過去データのインポート機能などが改善されました。
アップデート手順
Step 1: バックアップ
何よりもまずバックアップです。
プロジェクトディレクトリごとコピー
$ cp -r ~/<your-emdash-project> ~/<your-emdash-project>-backup-$(date +%Y%m%d)※私の環境での例
$ cp -r ~/midoblog ~/midoblog-backup-$(date +%Y%m%d)D1 データベースのバックアップ
D1 には タイムトラベルという常時有効のポイントインタイムリカバリ機能があり、過去30日間の任意の分単位に復元できます。追加操作や追加コストは不要です。今回は Time Travel が動いていることの確認と、作業日時だけメモしました。
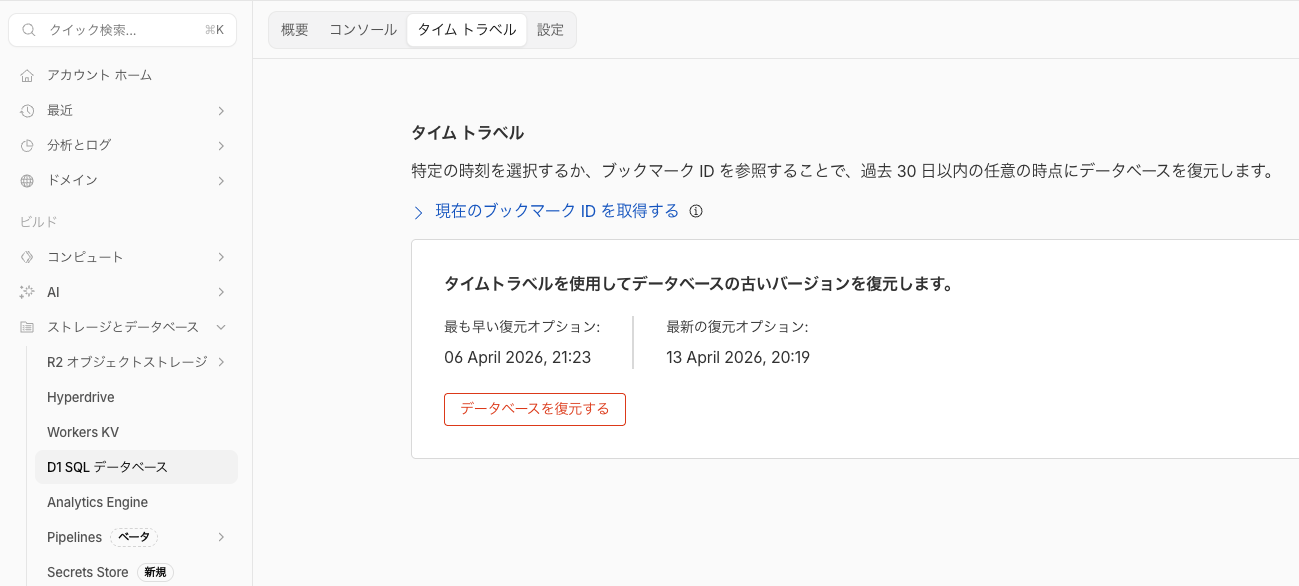
※復元はデータベースを上書きする操作ですが、復元時に「元に戻すためのブックマーク」が返されるので、復元自体のやり直しもできます。
Step 2: カスタマイズ箇所の把握
テンプレートから変更を加えたファイルを確認します。
$ find src -type f | sort
src/components/PostCard.astro
src/components/TagList.astro
src/layouts/Base.astro
src/live.config.ts
src/pages/404.astro
src/pages/category/[slug].astro
src/pages/index.astro
src/pages/pages/[slug].astro
src/pages/posts/[slug].astro
src/pages/posts/index.astro
src/pages/rss.xml.ts
src/pages/search.astro
src/pages/tag/[slug].astro
src/styles/theme.css
src/worker.ts
上記がテンプレートのデフォルト構成です。
参考として、私の環境では以下のようになりました。デフォルト構成との差分がカスタマイズ箇所ですので退避しました。
$ find src -type f | sort
src/components/PostCard.astro
src/components/TagList.astro
src/layouts/Base.astro
src/live.config.ts
src/pages/404.astro
src/pages/category/[slug].astro
src/pages/glossary/[slug].astro       ← 追加(用語集の個別ページ)
src/pages/glossary/index.astro        ← 追加(用語集の一覧ページ)
src/pages/index.astro
src/pages/pages/[slug].astro
src/pages/posts/[slug].astro          ← 変更(CJK読了時間のimport追加)
src/pages/posts/index.astro
src/pages/rss.xml.ts
src/pages/search.astro
src/pages/tag/[slug].astro
src/styles/theme.css
src/utils/reading-time.ts             ← 追加(CJK対応の読了時間計算)
src/worker.ts※AIに聞いたところ、変更・追加したファイルだけを絞り込むには、package.json(初期生成時のファイル)より新しいファイルを抽出すると便利そうです。
$ find src -type f -newer package.json | sort
src/pages/glossary/[slug].astro
src/pages/glossary/index.astro
src/pages/posts/[slug].astro
src/utils/reading-time.ts
Step 3: パッケージ更新
EmDash の公式ドキュメントにおそらくアップデート手順は記載されていません(2026年4月時点)。
EmDash は Astro インテグレーションとして npm パッケージで配布されているので、package.json の dependencies を確認して、EmDash 関連パッケージをまとめて更新します。
$ cat package.json出力の dependencies セクションに EmDash 関連パッケージが並んでいます。
"dependencies": {
    "@emdash-cms/cloudflare": "^0.1.0",
    "@emdash-cms/plugin-forms": "^0.1.0",
    "@emdash-cms/plugin-webhook-notifier": "^0.1.0",
    "emdash": "^0.1.0",
    ...
}
ここに出てくる emdash 本体と @emdash-cms/* パッケージが更新対象です。
$ npm install emdash@^0.3.0 @emdash-cms/cloudflare@latest @emdash-cms/plugin-forms@latest @emdash-cms/plugin-webhook-notifier@latest

# ⚠️ peer dependency の競合エラーが出ます
npm error ERESOLVE unable to resolve dependency tree
npm error peer emdash@"0.1.1" from @emdash-cms/plugin-forms@0.1.1
@emdash-cms/plugin-forms が emdash@0.1.1 を要求していて 0.3.0 と衝突します。--legacy-peer-deps フラグで解決できました。
$ npm install emdash@^0.3.0 @emdash-cms/cloudflare@latest @emdash-cms/plugin-forms@latest @emdash-cms/plugin-webhook-notifier@latest --legacy-peer-deps

added 8 packages, removed 17 packages, changed 58 packages, and audited 730 packages in 14s
Step 4: ビルドと不足パッケージの解消
% npm run build

> midoblog@0.0.1 build
> astro build

19:20:19 [@astrojs/cloudflare] Enabling image processing with Cloudflare Images for production with the "IMAGES" Images binding.
19:20:19 [@astrojs/cloudflare] Enabling sessions with Cloudflare KV with the "SESSION" KV binding.


  — E M D A S H —


  › Admin UI    /_emdash/admin
  › API         /_emdash/api/*

19:20:19 [vite] Re-optimizing dependencies because lockfile has changed
19:20:21 [vite] Re-optimizing dependencies because lockfile has changed
19:20:21 [vite] Re-optimizing dependencies because lockfile has changed
✘ [ERROR] Could not resolve "@tiptap/extension-collaboration"

    node_modules/@tiptap/extension-drag-handle/dist/index.js:7:31:
      7 │ import { isChangeOrigin } from "@tiptap/extension-collaboration";
        ╵                                ~~~~~~~~~~~~~~~~~~~~~~~~~~~~~~~~~

  You can mark the path "@tiptap/extension-collaboration" as external to exclude it from the bundle,
  which will remove this error and leave the unresolved path in the bundle.

✘ [ERROR] Could not resolve "@tiptap/y-tiptap"

    node_modules/@tiptap/extension-drag-handle/dist/index.js:13:7:
      13 │ } from "@tiptap/y-tiptap";
         ╵        ~~~~~~~~~~~~~~~~~~

  You can mark the path "@tiptap/y-tiptap" as external to exclude it from the bundle, which will
  remove this error and leave the unresolved path in the bundle.

Could not resolve "@tiptap/extension-collaboration"
  Location:
    node_modules/@tiptap/extension-drag-handle/dist/index.js:7:31
  Stack trace:
    at failureErrorWithLog (/Users/midoemon/midoblog/node_modules/esbuild/lib/main.js:1748:15)
    at /Users/midoemon/midoblog/node_modules/esbuild/lib/main.js:1626:9
ビルドすると tiptap 関連の依存パッケージが不足しているエラーが出ます。エラーメッセージの Could not resolve "パッケージ名" の部分がそのまま追加すべきパッケージ名です。
言われた通りに追加して、再度ビルドします。
$ npm install @tiptap/extension-collaboration @tiptap/y-tiptap --legacy-peer-deps
$ npm run build

# まだ足りない
[ERROR] Could not resolve "yjs"
[ERROR] Could not resolve "y-protocols/awareness"
依存の依存が芋づる式に不足しています。これも追加します。
midoemon@KenichinoMacBook-Pro midoblog % npm install yjs y-protocols --legacy-peer-deps

added 2 packages, and audited 736 packages in 743ms

247 packages are looking for funding
  run `npm fund` for details

9 vulnerabilities (5 moderate, 4 high)

To address issues that do not require attention, run:
  npm audit fix

To address all issues possible (including breaking changes), run:
  npm audit fix --force

Some issues need review, and may require choosing
a different dependency.

Run `npm audit` for details.
改めてビルド
$ npm run build

> midoblog@0.0.1 build
> astro build

19:21:25 [@astrojs/cloudflare] Enabling image processing with Cloudflare Images for production with the "IMAGES" Images binding.
19:21:25 [@astrojs/cloudflare] Enabling sessions with Cloudflare KV with the "SESSION" KV binding.


  — E M D A S H —


  › Admin UI    /_emdash/admin
  › API         /_emdash/api/*

19:21:25 [vite] Re-optimizing dependencies because lockfile has changed
19:21:27 [vite] Re-optimizing dependencies because lockfile has changed
19:21:28 [types] Generated 2.28s
19:21:28 [build] output: "server"
19:21:28 [build] mode: "server"
19:21:28 [build] directory: /Users/midoemon/midoblog/dist/
19:21:28 [build] adapter: @astrojs/cloudflare
19:21:28 [build] Collecting build info...
19:21:28 [build] ✓ Completed in 2.32s.
19:21:28 [build] Building server entrypoints...
19:21:29 [vite] ✓ built in 1.50s
19:21:32 [vite] ✓ built in 2.51s
19:21:36 [WARN] [vite]
(!) Some chunks are larger than 500 kB after minification. Consider:
- Using dynamic import() to code-split the application
- Use build.rollupOptions.output.manualChunks to improve chunking: https://rollupjs.org/configuration-options/#output-manualchunks
- Adjust chunk size limit for this warning via build.chunkSizeWarningLimit.
19:21:36 [vite] ✓ built in 4.04s
19:21:36 [build] Rearranging server assets...
19:21:36 [build] ✓ Completed in 8.09s.
19:21:36 [emdash] Build complete
19:21:36 [build] Server built in 10.43s
19:21:36 [build] Complete!
3回目でようやくビルドが通りました。
Complete! が表示されればビルド成功です。
chunk サイズの警告(Some chunks are larger than 500 kB after minification)は無視して問題ありません。
まとめると、追加が必要なパッケージはこの4つです。
$ npm install @tiptap/extension-collaboration @tiptap/y-tiptap yjs y-protocols --legacy-peer-depsStep 5: ローカル確認
デプロイ前に、ローカルでビルドが正しく動作するか確認します。
$ npm run dev起動したら、ブラウザで以下のURLにアクセスします。
http://localhost:4321/— トップページが表示されるかhttp://localhost:4321/posts/— 記事一覧ページが表示されるかhttp://localhost:4321/_emdash/admin— 管理画面が表示されるか
記事一覧は「No posts yet.」と空になりますが、これは正常です。EmDash は本番データを Cloudflare D1(リモート)に保存しているため、ローカルの開発サーバーからはデータにアクセスできません。ここで確認したいのは「ページがエラーなく表示されること」であり、データの中身ではありません。
カスタマイズしたページがある場合(私の環境では /glossary/)もあわせて確認しておくと安心です。
問題なければ Ctrl+C で開発サーバーを停止し、デプロイに進みます。
Step 6: デプロイ
$ npm run build && npm run deploy

Uploaded your-project (13.21 sec)
Deployed your-project triggers (0.93 sec)
  https://your-project.your-subdomain.workers.dev
デプロイ後、本番環境で以下を確認します:
- [ ] トップページ: 記事が消えていないか?(ローカルなら空でもOK)
- [ ] 個別記事ページ: 正常に表示されているか?
- [ ] 管理画面 (
/_emdash/admin): ログインできるか?管理画面にログインできる - [ ] 独自カスタマイズ: 自分の追加したページ(私の場合、用語集
/glossary/)が表示されるか?
以上で完了です。
ロールバック
問題が起きた場合はバックアップから復元できます。
※私の環境の例
$ mv ~/midoblog ~/midoblog-failed
$ cp -r ~/midoblog-backup-20260413 ~/midoblog
$ cd ~/midoblog
$ npm run build && npm run deploy
※D1 のデータに問題があれば、Cloudflare Dashboard のタイムトラベル機能でアップデート前の時点に復元します。
おわりに
EmDash はまだベータプレビュー段階ですが、Astro + Cloudflare の構成で軽快に動作しています。
アップデート時の依存関係の問題は、今後のリリースで解消されていくと思います。
同じ環境でアップデートを検討している方の参考になれば幸いです。
No comments yet